2 part mold & casting in resin |
|
|
Home
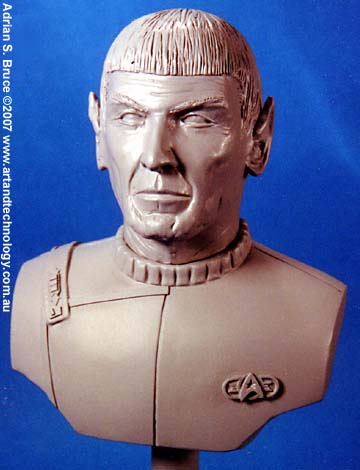
Contact Us About Us The process of making a 2 part mold in RTV silicon rubber then casting in polyurethane resin of a small 1/6 scale bust model is explained in this article. The main reason to cast a piece in resin is to produce resilient duplicates. Super Sculpey, while advertised as chip proof, is much more fragile and delicate than the equivalent resin part. Last Updated: Jan 27 2023 The Master
In this case the bulk of the master pattern was made with
Super Sculpey while small mechanical details are
fabricated from Evergreen styrene strip. 5 minute Epoxy and super glue were used to stick the parts together to form a military hero styled bust. Everything was primed with gray car primer, which I believe is acrylic paint. . Molds
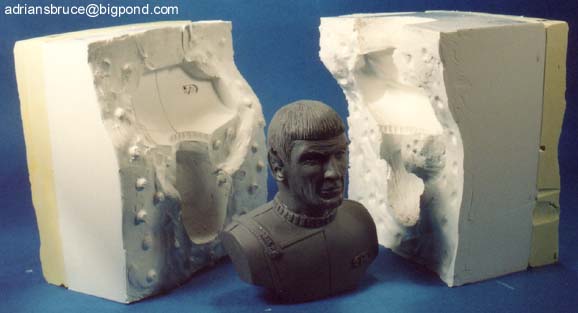
A top gate 2 part RTV mold was made, as the base of the
bust has quite a large opening to allow air to escape
while casting . Originally , the head and shoulders were
to be cast as separate pieces, but it came to pass that a
single casting using a single 2 part mold was made
instead. The part to be molded is buried in plasticine to where the parting line will be. It is important that the part and the plasticine form right angles at the parting line. One of the problems I have in summer is that plasticine is very soft and difficult to sculpt smooth and flat . A natural clay can be a better choice.
A tool made from styrene rod is used to form locating pegs for the mold halves in the plasticine . The plasticine, not the sculpture, is given a coating of "Barrier Coat" and a mold wall made from 1mm sheet styrene and packing tape on a sheet styrene base. The highly respected Japanese Garage kit company , Max Factory, actually uses household floor wax for Barrier Coat, with very good results. About 15mm is left around the sculptures and the mold wall. The resulting molding box used was 9.5cm x 10.5 cm with a wall height of about 11cm. Sheet styrene is cut to fit the piece to be molded, as it is much cheaper than the RTV silicon rubber used to make the molds. There are quite a few different types of RTV silicon
rubber available. Some are considerably more expensive ,
softer, stronger and slower to cure than others. I've
used both Waker and ShinEtsu brands at different time .
Walker being much more runny in it's uncured state and
possibly more flexible in the cured state than the
ShinEtsu type ( the cheapest!)I used here. The runnier
the uncured gum is when your making the mold is , it
seems the less likey you will be to get trapped bubbles.
They get more of a chance to get out. The ShinEtsu silicon gum I used this time comes in a 1kg house paint like metal tin and has catalyst added at the ratio 1:100 and the instructions say to stir the unmixed components and then the catalyst rubber mixture very well. I mixed the silicon in a clear plastic measuring jug that can hold up to 500cc. I used a paint stirring attachment on a variable speed electric drill. The ratios are by weight so I have a 0 to 100gm scale and borrow the kitchen 0 t o 5kg scales for mixing chemicals. The quantity of silicon needed per mold half is determined from the box dimensions and the average box depth that would result in about 1..5cm of silicon to cover the piece being cast. Too much is better than not enough. As you may need to cut extra vents from the bottom of the mold to allow trapped air to escape, you want enough silicon surrounding the piece to allow this.
The first half of the mold used 350cc of rubber. A small paintbrush was used to paint on RTV into all the cracks and crevices and then the silicon was slowly poured from one side of the box, to stop bubbles from forming against the piece and the mold. After 8 hours , 100cc of plaster was made up and layered on top of the silicon, to form a 1cm thick hard backup layer.
After the Plaster was set, one section of tape from the dam is removed and the mold walls removed. The plasticine was carefully removed without removing the half buried piece from the mold. The gate for casting was made from plasticine and it and the exposed face of the mold ( but again, not the Spock bust ) was again coated in "Barrier Coat". If the "Barrier Coat' is not applied evenly ,
then the second half of silicon will bond to the first,
in the places you missed and you may loose everything.
The 'Barrier Coat' I used sets to form a 'Glad Wrap' like
layer on the material it is applied to. The mold wall was then taped back in place and the second mold half poured, this time with 450cc of silicon rubber. After it was set another 100cc of plaster was added to make an additional 1cm backing to each side of the mold. Once that was set the mold wall was disassembled,
plasticine removed and all traces of 'Barrier Coat
cleaned of the Rubber mold halves. RTV is expensive messy
stuff and practically the whole 1kg was used to make the
two piece mold. Sheet styrene to make the mold walls, the paintbrush , Barrier Coat, measuring cups , and plasticine were extra on top of that. When the mold was done it was found that 3 small bubbles were present. Also 'Barrier coat' hadn't made its way to the bottom of all the alignment lugs, so some of these were ripped and malformed ( but still useful for their intended function) when the mold was separated, so the mold isn't perfect. Casting
Casting is done with two a part polyurethane resin, ivory
Placast as that is what the store had at the time. The
other popular brand in Japan is Hei-Cast .  The Spock mold takes about 80cc
of resin. To prolong the life of the mold, a silicon
spray is applied to the mold halves before joining them.
This allows the cast part to be removed more easily and
reduces the tendency for the mold to tear. 40cc of A and
B are carefully measured out into separate cups. This
involved pouring out 45gms of A and B into separate paper
cups on 0 to 100gms scales. Care was taken to wipe off
any chemical drips down the sides of the resin bottles.
With the mold halves joined and held together with rubber
bands the B cup was poured into the A cup, stirred a few
times, then poured into the mold. In the moments while the resin was still liquid, the mold was held and tapped on the bottom to try and dislodge any bubbles from the molds surface. All this done while wearing chemical safe gloves and mask in a well ventilated area. If I had a garage, I would have used it . The mixed Placast resin is completely hard in about 7 minutes and generates a lot of heat in the process. Hei-Cast is slower setting and I have found it easier to use, but it is only available in large, non resealable tins.
Some castings are better than others. If a particular feature, such as ends of pointy ears, always have bubbles, extra paths to the top of the mold need to be cut with a V bladed carving tool to allow the air to escape when the resin is introduced. I added such vents from the top and bottom of each ear. These resin spruces were so small I cut them off each casting as I removed it from the mold. A bottom gate mold may result in less casting faults when hand casting, dependent upon the shape of the part to be cast. Between 3 and 4 castings can be done per hour.
Home
|
 Click to view larger image.
 Click to view larger image.